Introduction
If you hate messing around with formatting in Google Docs, listen up! Ever want to make those bibliographies look neat without pulling your hair out? Well, get ready to learn the secret of the hanging indent – it’ll change your life (or at least how your research papers look). This guide will make you a hanging indent master in no time!

What is a Hanging Indent?
Okay, before we get into the nitty-gritty, let’s make sure we’re on the same page about what a hanging indent even is. Basically, it’s a fancy way of making lists (like for a bibliography) look way cleaner. The first line sticks out, and the rest of the lines are tucked in a bit. It makes things super easy for your reader’s eyes to jump from one item to the next. Think of it as making your research paper look super smart and organized!
Step-by-Step Guide to Creating a Hanging Indent in Google Docs
Now that we know what a hanging indent is, let’s get down to business. Follow these simple steps to master hanging indents in Google Docs:
Step 1: Open Google Docs
First things first, fire up Google Docs and open the document in which you want to create a hanging indent.
Step 2: Select the Text
Next, select the text you want to format with a hanging indent. This could be a bibliography, reference list, or any other section of your document that requires this formatting style.
Step 3: Access the Ruler
At the top of your Google Docs window, you’ll see a ruler. If you don’t see it, go to the “View” menu and make sure “Show ruler” is checked. The ruler is essential for adjusting the indentation of your text.
Step 4: Set the Left Indent
Place your cursor at the beginning of the paragraph you’ve selected. You’ll see a small blue rectangle on the left side of the ruler. This represents the left indent marker. Click and drag this marker to the right to set the desired indent for the first line of your paragraph. Typically, this is around 0.5 inches, but you can adjust it according to your preference.
Step 5: Set the Hanging Indent
Now, locate the light gray rectangle directly below the blue indent marker. This is the left indent marker for the subsequent lines of your paragraph. Click and drag this marker to the right to create the hanging indent. A hanging indent is usually set at around 0.25 to 0.5 inches, but you can adjust it based on your document’s requirements.
Step 6: Review and Adjust
Once you’ve set the left and hanging indents, review your formatting to ensure it looks the way you want. If you need to make further adjustments, simply click and drag the indent markers on the ruler until you’re satisfied with the layout.
Step 7: Apply to Multiple Paragraphs (Optional)
If you have multiple paragraphs that require a hanging indent, you don’t have to format each one individually. Simply select all the paragraphs, follow the steps above to set the indents for the first paragraph, and the formatting will be applied to the entire selection.

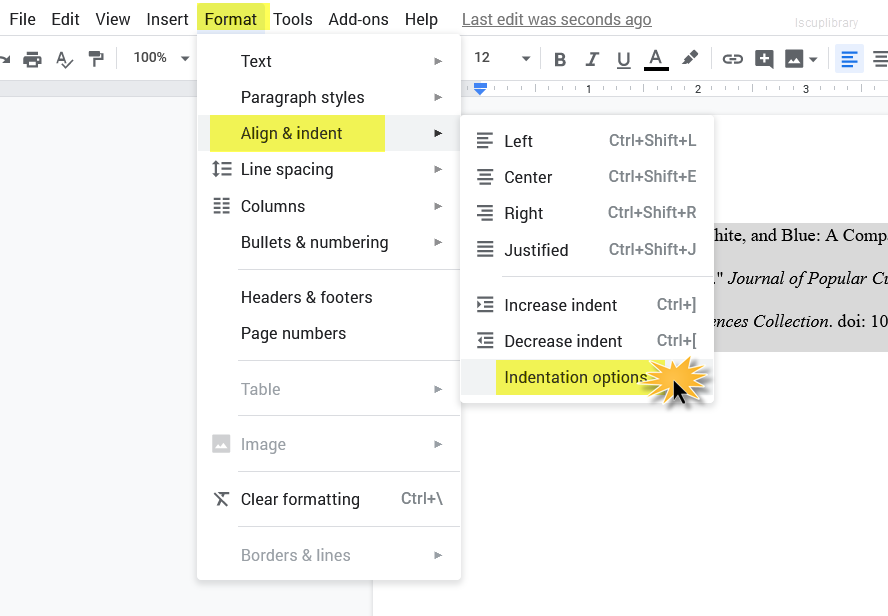
In your document, highlight your citation(s) to select them, then go to Format > Align & indent > Indentation options.

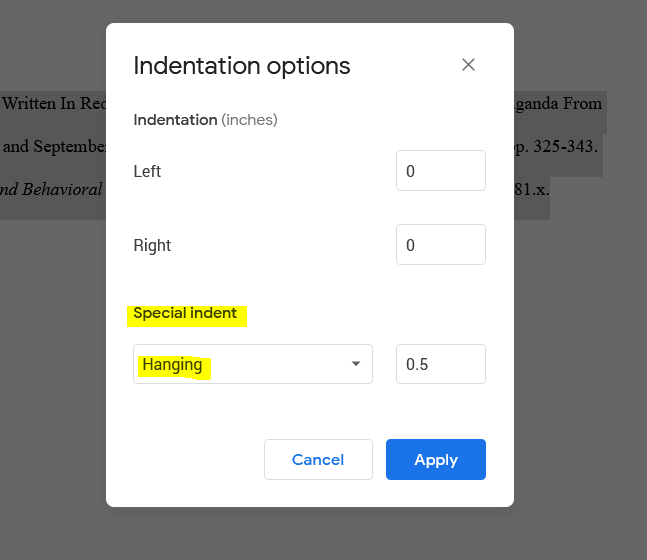
In the Indentation options window that pops up, select “hanging” under Special Indent. Make sure it says “0.5” in the field next to that dropdown, then click Apply.
Voila! You should have a lovely (or several lovely) citation(s) with the indentation.
Tips for Perfecting Your Hanging Indents
Here are a few additional tips to help you master hanging indents in Google Docs.
Use Tab Key: While the ruler is the preferred method for setting indents, you can also use the Tab key to create a hanging indent. Simply place your cursor at the beginning of the paragraph, press the Tab key, and adjust the indent as needed.
Check Spacing: Pay attention to the spacing between your lines. You may need to adjust the line spacing to ensure your document looks polished and professional.
Save Formatting as a Style: If you frequently use hanging indents in your documents, consider saving the formatting as a custom style. This will allow you to apply the formatting with a single click, saving you time and effort in the long run.
Conclusion
Okay, you’ve got the power now! Creating a hanging indent in Google Docs is a seriously easy way to make your documents look polished and professional. You just followed the steps and BOOM – you’re a formatting whiz! Now get out there, try it out, and watch those bibliographies transform before your eyes. Your documents will thank you!
FAQs
What is a hanging indent, and when should I use it?
A hanging indent is a formatting style where the first line of a paragraph is flush with the left margin, while all subsequent lines are indented. It’s commonly used in academic writing and professional documents for creating bibliographies, reference lists, and citations.
2. How do I create a hanging indent in Google Docs?
To create a hanging indent in Google Docs, follow these steps:
- Open your Google Docs document.
- Select the text you want to format with a hanging indent.
- Access the ruler by going to the “View” menu and ensuring “Show ruler” is checked.
- Set the left indent marker for the first line of the paragraph.
- Set the hanging indent marker for the subsequent lines.
- Review and adjust the formatting as needed.
3. Can I apply a hanging indent to multiple paragraphs at once?
Yes, you can apply a hanging indent to multiple paragraphs simultaneously. Simply select all the paragraphs you want to format, follow the steps to set the indents for the first paragraph, and the formatting will be applied to the entire selection.
4. What if I don’t see the ruler in Google Docs?
If you don’t see the ruler in Google Docs, go to the “View” menu and make sure “Show ruler” is checked. The ruler is essential for adjusting the indentation of your text.
5. Can I use the Tab key to create a hanging indent?
Yes, you can use the Tab key to create a hanging indent in Google Docs. Simply place your cursor at the beginning of the paragraph, press the Tab key, and adjust the indent as needed. However, using the ruler is generally the preferred method for precise formatting.
6. How do I adjust the spacing between lines in a hanging indent?
To adjust the spacing between lines in a hanging indent, you can modify the line spacing settings in Google Docs. Click on the “Line spacing” button in the toolbar and select the desired spacing option. You may need to experiment with different settings to achieve the desired look.

